Showing posts with label google. Show all posts

Friday, March 18, 2016

Starting Places - Resources for Using Technology in the Classroom

http://imrodmartin.com/images/wp-content/2014/01/How-Technology-Is-Improving-Education-.jpg

I went to a fabulous conference this week on best apps and using mobile devices to strengthen student learning.  And while the conference was geared towards K-6, there were a number of resources that could be applicable at the secondary level as well.  By the end of the day I was on information overload and feeling overwhelmed (in a good way!) about all of the possibilities out there.  However, one of my favorite things I took away was simply the list of quality resources available for using technology in the classroom.  So I am sharing a couple of those resources with you today.  Some of the resources are geared towards specific devices or platforms such as iPads or Google, and others are more general resources, but they are all great starting places for ideas and tips on using technology in the classroom.  Thank you to the conference speaker Joann Troutner for the great learning and resources!

Learning in Hand - This was one of my favorites because of the great section on Project Based Learning (PBL). There is also info on this site that you can explore based on the type of device you have in the classroom.

Bloomin' Apps - I have loved Kathy Schrock and her website for years, especially when I was teaching in the classroom, and she has now expanded to include apps and tech tools organized based on Blooms Taxonomy.

Google Resources - Shake Up Learning - This site is focued on Chromebooks and resources for using Chromebooks.  It also provides a variety of Help Sheets for Google tools and information on a variety of Chrome extensions.

Ed Tech Teacher's Apps - The best option for this site is that instead of just looking up random tools or resources based on device, the resources are sorted based on classroom activity as well.  So this site is an easy resource for searching in a more meaningful way.

Apps for Children with Special Needs - This is a great site for finding reviews of apps that can work well for students with a variety of special needs.

iPad Academy - This is a great blog with tutorials, ideas for how to use apps and resources, and current information on new apps.  If you find you don't have time to sift through the variety of apps and thousands of options, use this site to help narrow down the list.

Educational Technology Guy - This is another great blog with lot of materials focused more on Google tools and Android devices.  Like Learning in Hand, there is a great section with PBL ideas and resources.

Overall, this conference was well worth the time and I came away with a lot of great resources to start with.  I have shared just a few of the ones I liked the most, so check them out and see what kind of new ideas you can find!

Thursday, March 3, 2016

Easy Online Grading with JoeZoo

http://1.bp.blogspot.com/-_dyBpxX5KAw/Vqtt11RoJTI/AAAAAAAADBE/KDANr-eug0k/s1600/joezoo-logo-horizontal.png

Well, I missed my post last week because of a busy Friday, but it actually worked out in my favor, because I had learned from my colleague at North about a useful little grading tool called JoeZoo.  However, after looking at it and reading about it, it looked like they were releasing some new features this past weekend, so in the end I decided to wait until this week to talk about it.

I have found this tool to be incredibly effective for making grading using Google Docs much easier.  I have posted in the past about some other tools that can work for using rubrics and grading in Google Docs, but JoeZoo has some great features and a new integration with Google Classroom that really makes it efficient.

There are three primary functions of this tool: writing feedback, building and using rubrics, and grading assignments.  The writing feedback option allows teachers to provide quick feedback on writing assignments by using existing comments and corrections based on the most frequent writing errors that teachers have to correct. So instead of writing or typing "run-on sentence" fifty times or even copying and pasting it, with just a couple of clicks you can easily provide that feedback.  The feedback is also categorized into different areas like formatting, grammar, mechanics, punctuation, and structure, which allows students to see where they received the most comments and what areas they need to focus on.  It can save a lot of time when grading writing assignments.  In addition to the writing feedback, there is a feature still in beta format called Monkey Checker, which will actually auto check the assignment for errors and provide that common error feedback for you.

Another are this tool excels in is rubric use. There is no need for tables or charts to make a rubric or worrying about structure.  The feature allows for creating a rubric (or copying and pasting existing rubric items) into an easy to use format and then will insert the rubric directly into the document, making feedback quick and easy.  In addition, the grading tool allows for easy grading using the rubric and providing feedback, along with converting that rubric score into an actual grade.

One issue I originally had with the tool was that to grade an assignment you had to add students to your list and choose the student name, etc.  It was kind of a pain and the thought of adding an entire class of students was not pleasant.  However, that is where the Google Classroom integration comes in.  With that new feature, you can connect JoeZoo to your Google Classroom and it will automatically list all of the students in your course, making choosing and grading much easier.

Overall, this is a great tool with a lot of potential.  The developers love feedback and suggestions and frequently implement them, so there is a lot of potential for growth and improvement as well.  If you are a teacher who has students complete assignments using Google Docs, I would recommend checking out JoeZoo to make grading and providing feedback faster and easier.

Check out this link for a variety of videos from the developers on using the tool.

Friday, January 22, 2016

Some Changes to Google Forms

Many teachers have discovered the benefits that Google Forms can bring to the classroom. It can be used for quizzes, exit tickets, and rubric assessments. Many of you may already use Google Forms, but may have noticed some changes to the forms since school started this fall.

The new Google Forms looks a lot like the Classroom Interface. Both the question and response page are available from the form, yet you can still get a separate response sheet. Let's look at the anatomy of the new form.


From the picture, you can see that the form looks a little different than it did in the past, but it functions the same way.

If you don't like the new form, click on the running guy picture in the lower left and it will revert to the old form version (in case you want to flee from this change!).

Besides looking a bit different, Google has renamed a few question types.
    • SHORT ANSWER used to be called TEXT
    • DROPDOWN used to be called CHOOSE FROM A LIST
    • LINEAR SCALE used to be called SCALE
    • MULTIPLE CHOICE GRID used to be called GRID
The response tab allows you to turn on and off accepting responses. Clicking the Green box also allows you to create a spreadsheet rather than just viewing responses in the Form.


Whether you are a veteran of using Google Forms or a newcomer, once you get used to the changes, you will enjoy these new features.

Check out this video tutorial for more information:

Friday, January 8, 2016

Another Rubric Tool - DocAppender

http://cloudlab.newvisions.org/_/rsrc/1445871114197/add-ons/docappender/docAppender_lg.png

Welcome back!  I hope you all had a restful and fun holiday! One of my earlier posts this fall discussed the tool Orange Slice, which is an add-on for Google that allows you to easily insert and use rubrics with Google docs.  Today I wanted to look at another rubric tool called DocAppender.  This tool is similar to Orange Slice in that it is a Google add-on, but this tool allows you use a Google Form that stamps a rubric into your document.

To use the tool, you basically create a Google Form, add the DocAppender add-on to the form (which you only need to do once).  Then you can choose a folder where the student documents are stored, and if you use Google Classroom, this works seamlessly to include your Classroom folders.  You then choose rubric items to use for that particular assignment, choose the score, and submit. The rubric is then stamped onto the assignment you are grading.  It can also work really well for peer editing.  See the links below for some tutorials and more information.

DocAppender Site
Youtube Tutorial on Using DocAppender


Step by step instructions and examples for DocAppender

Friday, December 4, 2015

Keeping it Organized with Google Keep

http://r3.whistleout.com/public/images/articles/2013/12/Google-Keep-feature.png


Well, it has been a few weeks.  Things got kind of crazy before Thanksgiving, so hopefully we can pick it up again in December and finish the year strong. I'm going to keep it simple this week and talk about a tool I learned about a couple of weeks ago from a colleague of mine at South that I absolutely love! While it has been around for quite a while, this is a new tool for me and has proved incredibly useful in just a few short weeks.

I am a list-maker.  I make lists for everything: groceries, things I have to do at work and home, Christmas cards to send, tech tool ideas for this blog, etc. Just about anything in my life that can have a list, does.  I have tried a number of tools to organize and track my lists.  I have used tools from the computer, online tools, and ones I can sync to my phone.  While most of them had benefits and I liked them, this new one is by far the best I have found and definitely a keeper.

Google Keep is not just a post-it note type list organizer.  It goes beyond just making my own lists.  One of my favorite features so far is the sharing feature.  I have lists that I have share with co-workers for things we need to get done, and lists I share with my husband so he knows what to get at the grocery store on his way home.  Just like with my Google documents, I can share separate lists and notes with different people.  This has been incredibly helpful and has helped streamline my organization.

Some other features I really enjoy include color-coding my lists.  For example, right now, my work lists are orange, my home lists are blue, my purchasing lists are green, and my Christmas lists are red.  This helps with visual organization.  I can also drag and drop my lists on my Google Keep page to organize them in any order I want, so I can keep work and home lists separate.  For individual lists, I can set reminders for myself if there is something urgent I need to get done, add a picture to my list (this has been really helpful for my Christmas buying list), archive lists I don't want immediately visible but still want to access, and other features like labeling, including checkboxes on my lists if I want, and deleting items I have checked off the list.  For a quick and easy tool, it really has a lot of features and options.

Overall, this is a simple tool and for many of us, a necessary one.  What I like most about it is the easy use while it includes a variety of features.  Most of all, I like the sharing options.  Check out Google Keep and add it to your Chrome on your PC from the Chrome Store, or add it to your phone, or both!  This is a great tool to help keep both teachers and students organized.  So if your New Year's resolution this year is going to be getting organized (again!), get a head start and try out Google Keep.

Google Keep Site

Friday, November 6, 2015

Orange Slice - Not the Kind You Eat

https://blogger.googleusercontent.com/img/b/R29vZ2xl/AVvXsEhd9VeBsaGBfK7S1Ujyuom3UiZGZB3_u_uj-wEOgMG6_Na03XRxTbFPGK9xuvkuI9ZI8x5yDxuSwdC9dPSsoUrFKeal44_dgtyAcqUEiTc1uHyqSIBk_yuBkIhTTPwzyCXrRbGX5Hv_Iiw-/s1600/slice.png

This week my tech coach colleague up at North called me with a new tool he was just starting to look at called Orange Slice.  While the name won't tell you what the tool does, basically it is an add-on for Google that lets you use rubrics right within a document.  For teachers who use rubrics for grading this will be a great tool.  Additionally, because of the Google connection, it works great for integrating within Classroom and for peer editing.

This is by far the easiest tool I have seen so far for grading in Google Docs with rubrics.  Once the teacher installs the add-on (simply search for orangeslice in the Chrome store or use the link below), the next step is to either insert an existing rubric you already have, or build one within the tool.  There are some great easy to build options and it recognizes a variety of rubrics.  You can choose to assign scores to each category and give points or use a holistic rubric and just give feedback.  I was very excited to find that this tool works great with our existing 21st century skills rubrics.

One of the great things about this tool is how easy it can be if you incorporate it with using Google Classroom.  For instance, if you already give assignments in classroom and use the awesome feature that allows you to distribute one assignment document per student, you can simply include the rubric on the initial assignment, and then as you go into each assignment to grade it, you can use the rubric and grade right on the assignment.  It makes using rubrics with Google documents incredibly easy and fast.

Additionally, Orange Slice makes it very easy to have student peer review each other's work.  Again, if the rubric is already in the assignment, all the students have to do is install the add-on (which takes less than a minute), share their assignment with whoever will be peer reviewing it, and then they can use the add-on to rate the other student on each area of the rubric and provide feedback.  It is fast and easy and can help eliminate some of the organizational time that peer reviewing often requires.

Overall, this is a great tool to use for grading student assignments with rubrics, or for having students peer review.  Check out the videos below for more information on the tool and how to get the add-on yourself!

Orange Slice Youtube Channel
Link to Install Teacher Rubric from Chrome Store
Link to another blog post about the tool with great commentary from the creator


Friday, October 30, 2015

Making Life Easier with the Chrome App Launcher

https://blogger.googleusercontent.com/img/b/R29vZ2xl/AVvXsEhVAgSJ0gxJg_sWaxIKiexbTM8Epw2_WZAq50y3b7026G5CM3P732KG_JARYulOOJk4t5a-6MvXcUxG3PDuZZvopCiIFZVEucqSrjOqVI74ed4WhWyWRy2UL-65nwqECYSSaPmo592gOss/s1600/chrome_app_launcher.png
After taking a break last week for NDEA, this week I wanted to talk about a tool that is more about making life easier and more efficient for both teachers and students.  The Chrome App Launcher is a tool that I have only recently started using, and I am amazed at how much easier it is to access the things I need to get to easily and how much faster I can be using that instead of my Chrome Apps page.

Basically, the Chrome App Launcher allows you to launch your favorite and most frequently used apps right from your desktop instead of having to first open Chrome, go to your Apps page, scroll through your pages of Apps, and find the one you want.  Even if you are accessing something on your main apps page, for most of us we are talking at least 3 steps: launch the browser, click the apps button to get to your apps page, and then clicking the app.  The App Launcher allows you to access your apps faster by essentially putting the apps page access on your desktop.

In addition to making it easier to launch your apps, it also makes it easy to organize and find them.  If you have a lot of apps (I had three pages of them when I started), you can organize them into folders, making them easier to locate.  I now have folders for my Office apps, my personal apps, my educational tools, my new things to try, etc.  My most frequently used ones I left on their own on the main page to make access easier.  And if you still have a ton of apps even after organizing them, you can use the search bar at the top of the tool to search for specific apps.

But wait, there's more!  This tool does more than just allow you to organize and quickly access your apps. The search bar also allows you to do basic searches for simple questions or do a Google search that will then open in a browser.  I found the simple question searches helpful because you can search simple math questions and avoid having to open up a calculator on the computer, or simple conversion questions, which can be helpful in a math or FACs class, but also just for personal use.

Overall, this tool has a lot of potential just for making life easier.  Teachers and students can both use it to make working and using Google more efficient and to stay more organized. To get the App Launcher on your computer, do a search on your computer for Chrome App Launcher.  You should see the app launcher icon appear and you can either right click and choose "Pin to Taskbar" or drag it to your taskbar.  Then you are ready to go!

Friday, October 2, 2015

Voice Typing in Google Docs

https://s3.amazonaws.com/images.seroundtable.com/google-docs-voice-typing-1393855170.png

So clearly I am on a little bit of a Google kick to start they year out, but I promise to expand the horizons going forward.  However, Google just has so many neat little tools, add-ons, and extensions that can make life so much easier when they are used at the right time or in the right circumstances.  The tool this week is one I learned about earlier this year from our Special Services Assistive Technology Consultant.  It is a tool in Google Docs called Voice Typing.

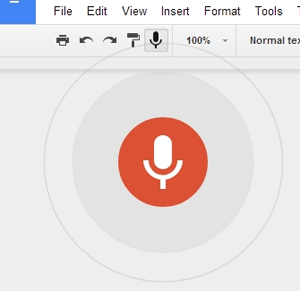
Voice Typing does just what it sounds like.  It allows an individual to speak text into a document instead of typing it.  This can be a great tool for some of those students you have who struggle with writing, with forming their thoughts into organized, constructive papers and assignments, or who have limitations with being able to type.  It would also be great in foreign language, as it supports a variety of languages.  So far, the tool appears to be very easy to use and very accurate.  Additionally, it is already a part of the documents tools menu, so there are no additional extensions or add-ons to add to the document or account.

Overall, this tool is simple, easy-to-use, and could be very helpful for certain students, certain classes, or certain assignments.  Try it out or check out the link and video below for more help and info!

Link to Google Page with Help Info

Youtube Video About Voice Typing


Friday, September 25, 2015

Welcome Back with More Google Classroom Features

From http://www.edudemic.com/wp-content/uploads/2014/08/google-classroom.png

Welcome back!  It was a short summer and it has been a fast school year so far.  Even though we've been in school for almost a month already, this is my first chance to get back to my weekly blogging.  This has been a whirlwind school year so far but things are finally settling down!

This blog post is actually a topic with some new tips that many of you who already use Google Classroom may be aware of.  However, there are even more new features that I just recently learned about from a colleague of mine, the tech coach at another school, and I think these new features are great and make Google Classroom even easier to use with other tools and sites!

So first, as many of you probably realized as you came back this school year, Google has added a number of new features to Classroom, making it easier to create and share assignments with students, but also to reuse assignments from year to year, which is a question I got A LOT last year from teachers.  In Classroom now, when you go to add content to a class and click the plus button at the bottom of the screen, there are some new options for asking questions and reusing posts.  Ask a question is a new option to start a discussion in class or do a quick formative assessment,  You can pose a question to the class, decide whether students just answer your question or can reply to each other, and then easily grade and give feedback in one place.  It also keeps the discussion stream in one place, instead of cluttering up the main classroom stream.

Along with the question feature, teachers can now reuse assignments.  This means that if you create a new class for each new year or semester, you can easily reuse assignments from last year, including creating new documents for your new students. Also, if you forget to assign a new assignment to multiple classes, you can easily fix that by reusing the assignment, instead of having to create it from scratch again.

Another new feature that has just been added here in September is the Calendar feature.  Each class now has a calendar and assignments are automatically there.  Additionally, teachers and students with multiple classes can view their Classroom Calendar to see all assignments and due dates for all classes at once.  This is an easy way to stay organized for both teachers and students.

And best of all, my favorite new feature to Classroom and one I think will continue to improve, is the ability to now easily add info from other online tools straight to your classroom.  Some online tools, such as Quizlet, PBS, Discovery Education, etc., have a button that allows you to share content from their sites directly to Chrome. So for instance, if I have a Quizlet review I have made, with one button I can share that to my Classroom for students to access. Check out the video below from my tech coach colleague at North for a walk through on how to do that.  
But it gets even better!  Now, Google has also created an extension for Chrome that lets you share any site and content from a site directly to your Google classroom.  So if I find a great resource to use or if I want all my students to access the same website at the same time, I no longer have to write it on the board and wait for them all to type it in, e-mail it to them all, or try and find another easy way for them to access it.  I can just post it to classroom with the extension button and they can all easily access it at once.  It makes things so much easier and faster.  Teachers have the option to Push the link to students and if they also have the extension it will actually open the website immediately, or use it in an announcement or assignment. There is so much potential for this extension!

Overall, the new features in Classroom means it just keeps getting better and easier!  It seems like every time I have a teacher tell me "it would be really nice if I could do this (insert thing they wish they could do) in classroom"... it eventually shows up.  So keep watching for more changes and updates, but for now, using Classroom continues to be an easy and effective way to manage content in the classroom.

Video for Using the Share Button in Online Tools:

Video for Using the Share to Classroom Extension:


Friday, April 24, 2015

Google Classroom - It's Getting Even Better with New Features Added

 
                                                                                http://www.medcie.org/wp-content/uploads/2014/09/google-classroom.jpg

I did an earlier post in October about Google Classroom and some of the new features it added last fall.  Of course, the requests keep coming for new and better options, and just this week Google added a couple of new, frequently requested features.

First, one of the biggest things teachers have asked for is the ability to collaborate with other teachers by adding them to your classroom site.  Until now, if a teacher wanted to "share" their classroom site with other teachers, those teachers could only be students.  This works well to just access assignments and posts, but does nothing to allow for true collaboration on assignments, shared grading, or both having access to all student assignments.  Now, you can add other teachers to your Google Classroom by going to your course's "About" page and choosing the option to "Invite Teacher."  This lets other teachers access your classroom site, post comments, announcements, assignments, see student assignments, and grade those assignments.


Another frequently requested feature is the ability to add announcements and assignments and not post them immediately to the site.  This allows teachers to add multiple assignments or announcements at one time, maybe for a whole week or an entire project, and then publish them later on for students to view.  This feature because teachers no longer have to go in and add something new right when you want students to view it, but can better prepare by adding things ahead of time, and then just going in and publishing them right when you need them.


Google Classroom continues to get better and provide more options and choices for teachers as a Learning Management System, and I'm sure they will continue to add more and more useful features based on the feedback provided.  If you use Google Classroom, hopefully you will find these new features helpful.  If you haven't tried it yet, check it out and check out the links below for more info and help about Google Classroom!

FPS Google Training Site Classroom Page

Friday, March 20, 2015

Google Research Tool - Make Researching and Citing in Google Docs Easy

https://s-media-cache-ak0.pinimg.com/originals/30/48/65/3048657c9293d6bccd8651b8c3367215.jpg

Google has a little known and very underutilized tool available for use in Google docs and presentations called simply Research.  However, the efficiency and potential time saver for this seemingly simple addition is enormous.  Working in a library, we spend a lot of our lesson time trying to drive home the idea that students need to cite, whether it's information they get from a source or a picture in their presentation.  The Google Research tool helps with that because it lets you do a search from directly within your document or presentation and then add a citation for information or add and cite a picture quickly and easily.

The research tool can be found under the Tools menu and Research.  Once opened, you can do a general Google search, or limit your search to images, scholar, quotes, dictionary, or tables.  From the list of search results, you can then preview each result, click on the link to go out to the full page on the web, insert a link for the result into your doc, or cite the result within your document.  Now, while the citation features is great, it does provide citations as footnotes, so for most students, they will still need to do some editing to make sure their citations are formatted correctly in their paper or presentation.  Additionally, when searching images, results can be filtered by usage rights so students are only searching for images that are free to use.  When you find an image, you can simply drag it onto your document or presentation, and a citation is automatically generated for the image, again as a footnote.

Overall, when having students work on papers and projects in Google docs and presentations, the Research tool can be a helpful way for them to find and easily cite information and images.  It can be especially helpful for younger students who are still working on really understanding the importance of citations, and provide them with an easy way to find and include that in their projects.  Additionally, instead of doing a regular Google search for images and videos, it can be an easy way to add images and videos to presentations, searching ones that are reusable by copyright, and easily adding them to a project.

Click this link for more information from Google on using the tool.
Here is a link to another blog post with step by step directions and pictures on the different features.
Final link - same blog as above, but a different post on adding images and videos to presentations with the research tool.

Friday, February 6, 2015

Google Chrome Extensions

In an earlier post, I talked about some of the neat things you can do with Chrome tabs to make your browsing experience easier and more efficient (I still love being able to pin tabs!).  However, I thought I should spend a little time talking about some of the more helpful Chrome extensions that I really find useful.  This post is really more about making working in Chrome easier and saving time, as opposed to things you might actually use in the classroom; however, some of these might be useful for your students, too.

For those of you who don't use them, extensions are extra features that can be added to Chrome that can customize your use of it and help make the things you do regularly easier to do.


Extensity:

Managing extensions and apps can be overwhelming.  For most people, they end up with a long line of icons at the top of the browser, and let's be honest, some extensions can cause other programs or sites to do funky things.  In general, a good practice is to only keep enabled the extensions that you use frequently, and disable the rest until you actually need to use them.  But this also means the extra work of opening your settings and going to your extensions control page and then enabling or disabling what you need.  Extensity solves that problem by providing one-click access to all your extensions and apps.  You click the extensions icon to use it, click the extension to turn on or off (gray means it is disabled or off).  You can also launch your apps from the extension, which means you don't have to keep opening a new tab or going back to your apps page every time you want to access one.  It makes using extensions and apps in Chrome faster and easier.  See this Cool Cat Teacher One-Minute Youtube Video for more information about how to use it.


Awesome Screenshot:

This extension allows you to take online screenshots and edit them directly in your browser.  You can capture full or partial website pages, crop, add shapes, arrows and lines, write or highlight, and blur different areas of the screenshot. You can color code your annotations and then save them for future use or copy and paste them directly into an online document or web tool.  See this video for more information and a walk-through of how to use it.


OneTab:

Onetab is another extension that just makes the whole Chrome user experience easier.  If you are one of those people who always have about fifty tabs open in your browser (it's okay, I know you're out there), OneTab is for you.  OneTab will take all of your open tabs (except pinned ones) and pull them into a single tab with a list of all your open tabs.  That way, since we know you aren't working in all fifty of them at once, you can still go back and forth easily, but you don't have to keep so many open that you can't even tell what they are.  It's a nice, easy extension if you like a lot of tabs open at once.

There are many more extensions out there and I'm sure I'll do another post soon with some more, but these are three that are helpful, easy to use, and can make Chrome more efficient.  Hopefully you'll find at least one that you like and can start to use! 


Friday, November 21, 2014

Voice Feedback for Student Assignments and Peer Editing Using Kaizena


The English teachers in my building approached me recently looking for an easy way for students to give each other feedback on writing assignments, and in particular they wanted a tool that would allow for voice feedback. For years we have told students to read their papers aloud or have someone else read it aloud in order to hear whether the sentence fluency or word choice needs work.  However, the teachers wanted a way to assign students to be able to do this and to give each other feedback and for teachers to more easily be able to track that.

We started using Kaizena, which is a tool that works with Google documents and allows students to provide feedback to each other, or for teachers to easily provide feedback to students on assignments.  This is not just a peer editing tool, although that was how we started with it, but teachers can also use the tool to easily give feedback.  Additionally, the tool can be used as an app in Google Drive, which allows for the benefits or the full website, or as an add-on in Google docs, which makes it easier and more streamlined for students.

The Kaizena add-on only has to be installed once, and from there it can be used on any Google doc.  Teachers or students can use it request feedback from someone else or to provide feedback.  Feedback can be given in the form of audio comments, text comments, or links, which is a great way to provide additional resources to students.  Additionally, tags can be used for those comments or corrections that seem to happen over and over, saving time by not having to retype or write the same comment every time.  The Kaizena website allows for more robust organizing multiple papers or from multiple class periods, and can help teachers with the organization of assignments and feedback.  Overall, this tool can make providing feedback to students or having students peer edit a much easier process. Check out the directions below for more help on accessing and using the app or add-on.

Directions for adding and using the App in Google Drive

Directions for adding and using the Add-on in Google Docs

Friday, November 7, 2014

Google Drive on Your Computer


So one of the problems I have trying to convert everything over to Google is that I have a lot of documents that I have made in Word or Adobe or other applications that do not convert well when I upload them to Google or that I want to keep in the original format so that I can still work on them in Word or wherever.  So my solution has been to use the Google Drive Client available on our computers.

What the Google Drive Client does is download Google Drive onto your computer and then sync it with your online files.  What this means is that if I have a Word document, I can save it as a Word document directly into that folder.  It then syncs online so it is still backed up in the cloud.  So if anything ever happens to my computer, I can still access all of my documents and I don't lose anything.  For those of us here at Davies, think about it like your H drive, just syncing online to Google instead of to the district servers.

Another benefit of this is that I can open these documents from Google Drive on my computer, and they will open in the correct program (ex. Word), and I can work on them there, save them as normal, and the changes save online, too.  Additionally, if I am not on my work computer, I can still access all of those documents online through my Google Drive there, and download them if I need to work on them (of course, that means I have to upload them again when I am done, but the benefits of anywhere access outweigh the inconvenience since that rarely happens).

So if your H drive is full and you have been toting around a huge external hard drive or trying to back-up all of your teaching materials to a bunch of flash drives, look into utilizing Google Drive for your computer.  With 30GB of storage, it will take a while to fill it up (compare that to the 1.5GB your H drive probably has).  The videos below show you how to install the Google Drive Client from the software center (if you have a new Windows 8 computer it is already installed and you can just open the app), and how to access and use your files once you have it downloaded.  See the library if you have questions or need help!

Google Drive Client Install through Software Center


Friday, October 24, 2014

Google Forms Add-ons


Well, we have add-ons for sheets and docs, and they certainly make our lives easier when it comes to all of the extra things we need to do in Google, especially when it come to teaching and managing student work.  Now, in order to add even more flexibility and freedom, we have add-ons for Forms.  This will make adding those extra things you always wish you had (limits on how many responses or an end date for your form, not having to repeatedly remake questions all the time in forms, etc.  From a blog post by Saurabh Gupta:

Here are just a few of the growing list of add-ons that you can use today with Google Forms:

  • formLimiter: Close your survey automatically, after a maximum number of responses is reached, or at a date and time of your choosing.
  • gMath: Create both simple and complex mathematical equations along with graphs and statistical displays directly in your form.
  • Form Values: Store and pull from lists that you use regularly in Forms, like a list of staff, students, rooms, resources or anything you want.
Here is a link to the full blog post.  And another link to a different technology blog with great information on technology for teachers.  Have fun making your forms, surveys, and classroom assessments even better!

Friday, October 17, 2014

Google Classroom - New Features

Well, we've been using Google classroom here for almost two months, so it was only a matter of time before some of the feedback we've been giving and some of the things that we wish it did came through.  Google has released some new features to classroom on our domain.  These include:


· Groups integration: Ability to pre-populate classes with your class list by using the people picker after clicking Invite under Students.
· Mark assignments as “done”: Students can mark assignments as complete even if there's nothing to turn in (e.g. watch a video, read a chapter, bring something to class)
· Export all grades: Teachers will now have the ability to download grades for all assignments at once, making it easier to export assignments to any gradebook
· Sorting: Teachers can now choose to sort students by first or last name, depending on their needs
· Greater teacher controls: Teachers can now set permissions for whether or not their class can post or comment in the stream, they can mute individual students from posting or commenting and can even view previously deleted items in the stream
There is a Tech Tip Video on our district Youtube channel with an overview of the features.  Click this link to access the video directly.  

Friday, October 10, 2014

Cool Things with Chrome Tabs


Tricks to Making Using Google Chrome Easier

This post is all about a few of the neat features Google Chrome has for their browsing tabs, which can make it easier to work in Chrome.

Pinning Tabs

First, pinning tabs.  We've all been there.  Working on a web page, you open a new tab, you are done with that tab and when you go to close it... you accidentally hit the red x and close all of your tabs.  Now you have to reopen your browser and start again.  Well, the pin tab feature helps prevent that.

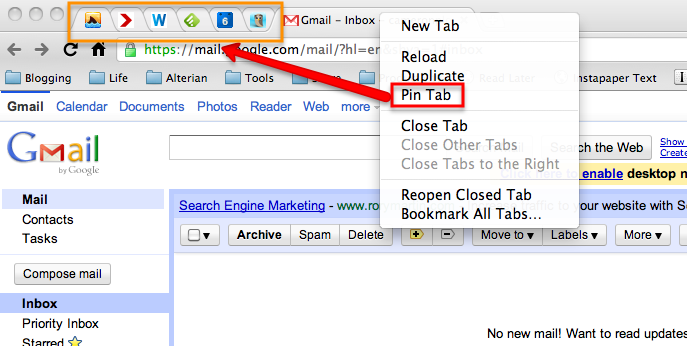
When you pin a tab in Google Chrome, it will keep that tab from accidentally closing. If you accidentally close your browser, when you reopen it, that tab will still be there.  An added bonus is that when you pin a tab, it gets minimized so only the icon shows, which leaves you room for a lot more tabs!

To pin a tab, simply right click on the tab and choose "Pin Tab."

You will see the tab minimize and show just the icon. 

http://cdn.techgyd.com/2015/09/pin-tab.png

Toggle Between Tabs

Next, toggling between tabs.  Just like you can toggle between open programs on your computer using Alt+Tab, you can toggle between tabs in Chrome by using Control + Tab Number.  So, if I am in the first tab I have open and want to move to the second tab, instead of using my mouse to click on the second tab, I can use Control + 2 to move to that tab.  It's very handy when you're using your keyboard.  

Closing Tabs

Finally, we'll talk about how to easily close tabs in Chrome, without having to close the whole browser or close each tab individually by clicking on its little x.  There are a couple of ways to do this.  
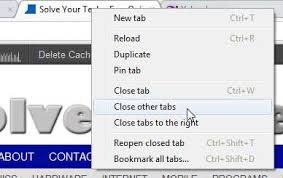
If you want to close all of the tabs except the one you are on (or ones you have pinned), right click on the tab you want to keep open, and choose the option to "Close other tabs."


Your other option is to close all the tabs to the right of the tab you are on (sorry, you can only close the tabs to the right, not the left).  But remember, you can also drag tabs around to reorder them if needed.  To close all the tabs to the right, right click on the tab you are keeping open and choose "Close tabs to the right."


Hopefully these few tips will help make your Chrome experience a little faster, easier, and more efficient.


Friday, October 3, 2014

Recent Changes to Google Forms

Google forms are a great way to do formative assessment with students, as they are quick and easy to make, provide results in easy to use and sort spreadsheets, as well as summary results in easy to analyze graphs.  Some recent changes make them even easier to use.

New features include:

  • Search the menus to quickly access Form features
  • Shuffle question order (great for formative assessments!)
  • Limit responses to one per user
  • Limit one response per column for grid style questions
  • Create shortened URL for sharing forms
Here is a recent blog post from the Google Gooru detailing the new form features:


5 More Updates to Customize Your Google Forms


    Google announced a redesigned version of Forms a few weeks ago, we hoped there were even more changes on the horizon. It looks like we got our wish with 5 more updates to bring even more customizability to Google’s survey tool.
A couple of the updates allow you to preserve the integrity of your surveys, by only allowing one responses per user and shuffling the order of questions. You can learn how to access all of the updates in the video, but it’s great to see an improved experience for anyone who wants to collect data.
The updates include:
  • ‘Search the menus’ to quickly access Form features
  • Shuffle question order
  • Limit responses to one per user
  • Limit one response per column for grid style questions
  • Create shortened URL for sharing forms
*Note* – The video refers to ‘require one response per row’ for grid style questions as the update. The update is actually ‘Limit one response per column’ which can be accessed by clicking ‘Advanced settings’ while inside the grid style question.